


When red velvet is presented, it’s often in cake or cupcake form. The iconic crumb of this Southern cake is typically a crimson red color layered between white icing. However, red velvet has hoity-toity northern beginnings.
Starting around 1840, Victorian bakers turned out “velvet cakes.” Not quite as sturdy as a pound cake, and not as etherial as a sponge cake, the velvet cake was a happy medium with it’s soft crumb and fluffy texture. A common ingredient in these velvet cakes was cocoa. Dutch-processed to be exact. Bakers realized that when cocoa was combined with an acid like vinegar in the batter, the finished bake resulted in a reddish mahogany color. (Vinegar was also used to leaven or raise the batter.) Over time this cocoa-based creation was called the “mahogany cake,” a cousin to the chocolate-based cake, Devil’s Food Cake. Due to the high costs of cocoa and baking chocolate, both were all the rage at fancy eating establishments like The Ritz in NYC.

But leave it to the Southerners around the roaring ’20s to add buttermilk to the mahogany cake’s base. This further enhanced the reddish color of the cake and added to the tang we continue to enjoy today. But it wasn’t until WWII, when cocoa was in short supply that the mahogany cake gained its classic ruby red blushes. Bakers still longing for crimson cocoa cakes used natural food ingredients like beet juice to enhance their war-time recipes. John Adams, owner of Adams Extract in Gonzales, Texas, and his wife Betty had previously fallen in love with the “red” velvet cake at first bite while on vacation to the Waldorf-Astoria hotel in NYC. War-time rationing and comfort food cravings encouraged the Adams to create and market a red velvet extract. Their combination of red food coloring with vanilla and butter extracts soon began flavoring cakes from sea to shining sea. Their original recipe is below:


As popular as red velvet cakes were, it didn’t become a mainstream layered delight until the movie Steel Magnolias featured a memorable groom’s cake…the red velvet armadillo cake. You know, the one with the gray icing! Ever since then, red velvet is found in cake, ice cream and candle scented forms. I even wrote about Red Velvet Cinnamon Rolls last year in honor of meeting Steel Magnolia’s author Robert Harling.
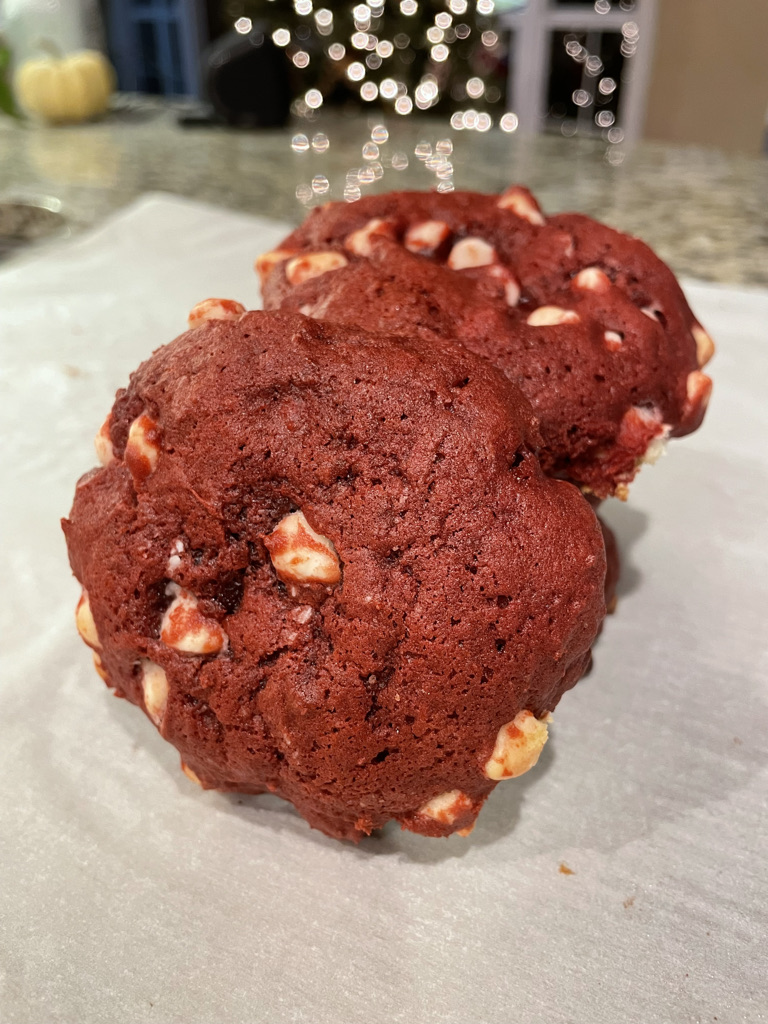
Without further ado, Day 3 is the Red Velvet Cookie! I realize this is yet another drop cookie, but with time being a premium, drop cookie recipes are the best. These Red Velvet Cookies are classically red from red food coloring. (If you want to get excited and substitute beet juice for the coloring, go for it.) The cookie’s chocolate flavor comes both cocoa powder and white chocolate chips. I love the addition of white chocolate chips because it’s a fun homage to the cake’s white icing. Sour cream also makes the finished cookie both moist and traditionally tangy.
With this recipe, I strongly recommend letting the dough snooze in your chill chest for at least 1 hour, or longer. If you don’t, your cookies will spread into red velvet pancakes when they bake. And be sure to not over bake them. Err on the side of the dough baking firm and barely browning around the edges. Your finished cookies will turn out tender and velvety like their name implies.
If Red Velvet Cookies aren’t magical enough, Day 4’s treat will be…Almond Joy Magic Cookie Bars!
PrintRed Velvet Cookies (Day 3)

A cookie nod to the classic Southern dessert, the Red Velvet Cake. White chocolate chips enhance the chocolate flavor, while sour cream gives a tang in this chewy cookie.
Ingredients
2 cups all-purpose flour
2 tbsp. unsweetened cocoa powder
1/2 tsp. baking soda
1/2 tsp, baking powder
1/2 tsp. salt (table, kosher or sea)
1/2 cup (1 stick) unsalted butter, at room temperature
1/2 cup granulated sugar
1/2 cup brown sugar, packed
2 large eggs, at room temperature
1–1/2 tsp. vanilla
2 tsp. red food coloring
1/4 cup sour cream, at room temperature
2 cups white chocolate chips
Instructions
Line 2 to 3 baking sheets with parchment paper. Set aside.
In a large bowl, sift together the flour, cocoa powder, baking soda, baking powder, and salt. Set aside.
Using a standing or hand-held mixer and a large bowl, cream the butter, granulated sugar and brown sugar until fluffy. Beat in the eggs and vanilla until even combined. Reduce the mixer to low and add 1/2 of the flour mixture until just combined. Stir the red food coloring and the sour cream together.. Beat into the butter-flour mixture. Stir in the remaining flour until just combined. Then stir in the white chocolate chips until evenly combined.
Cover the dough with plastic wrap. Refrigerate the dough for about 1 hour or until firm. While the dough is chilling preheat the oven to 350 degree F.
Using a large spoon or an ice-cream scoop, portion and drop generous tablespoon sized amounts of dough onto prepared baking sheets about 2 inches apart. Bake for 9-12 minutes or until cookies are puffy and the edges are set. Be careful to not over bake. Remove cookies from oven and allow to cool on the pan for about 5 minutes before moving to a wire rack to cool completely. Store baked cookies in a tightly sealed container for up to 5 days.
IMNPB
Recommended To You


